

Grinding is often the decisive step in tile adhesive removal from a concrete subfloor, but don’t start there until you’ve identified the adhesive. Have old or black mastic tested for asbestos before disturbing it; if it tests positive, an asbestos remediation company should remove it. Vinyl or linoleum tiles installed before 1980 may also contain asbestos in the tile or adhesive, so stop and consult a licensed asbestos abatement professional if they may be present.
Once the surface is safe to work on, remove ceramic tile with a masonry chisel and controlled, shallow pressure. Scrape or chisel away mortar residue afterward. Adhesive still bonded to the concrete may need grinding, which creates substantial dust and can damage the slab if handled carelessly.
This guide covers how to protect the work area, lift tiles without gouging the concrete, assess the exposed floor, and choose between scraping, softening, and grinding residue. It also explains when to stop and seek professional help so the subfloor is ready for its next finish without unnecessary damage.
Key Takeaways
- Inspect the exposed concrete for gouges, crumbling, and uneven areas before deciding how to prepare it for a new finish.
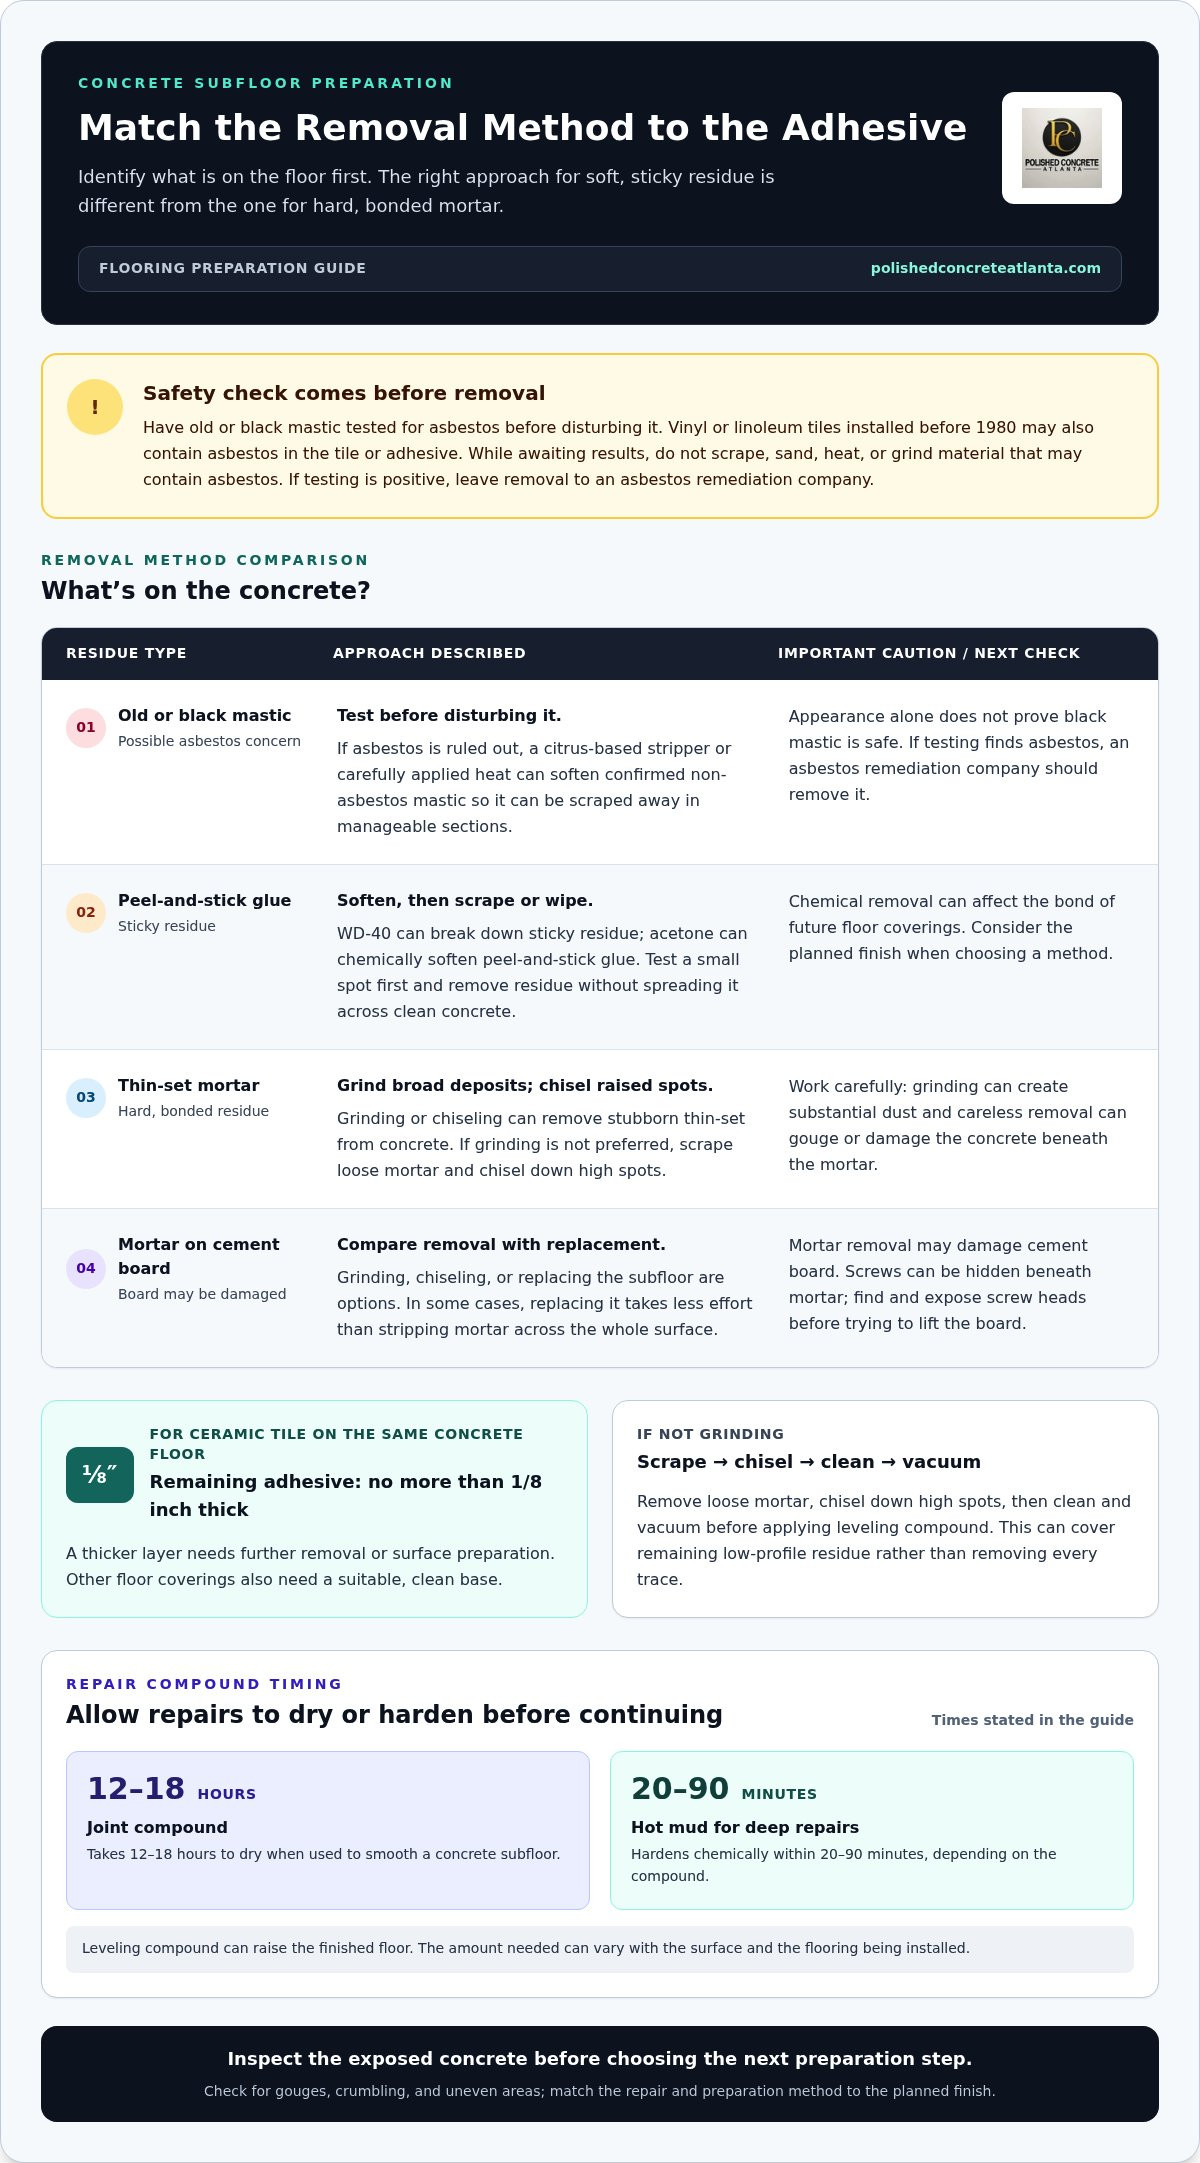
- For mortar residue, weigh grinding, chiseling, or replacing damaged cement board; removing bonded mortar can harm the surface beneath it.
- If ceramic tile is going back on the same concrete floor, keep remaining adhesive no more than 1/8 inch thick.
- Where grinding isn’t the right approach, scrape loose mortar, chisel down high spots, then clean and vacuum before applying leveling compound.
- Match the preparation method to the planned finish so the cleaned, repaired floor is ready for its next stage.
Removing mastic and checking for asbestos
Identify the adhesive before disturbing it, especially if it is old or black mastic. The safest removal method depends on the material and whether it may contain asbestos.
-
Check for asbestos before removal
Arrange asbestos testing before disturbing old or black mastic. Don’t scrape, sand, heat, or grind material that may contain asbestos while awaiting results. Vinyl or linoleum tiles installed before 1980 may contain asbestos in the tile or adhesive, so treat both as possible sources. If testing finds asbestos, leave removal to an asbestos remediation company.
-
Use safety precautions and PPE
Protect yourself and contain dust before removing tiles or adhesive. Wear a dust mask, safety glasses, thick-padded protective gloves, long sleeves, long pants, closed-toed shoes, and knee pads. Seal vents and doorways with plastic sheeting and masking tape to help contain dust. Keep the work area controlled, and do not disturb material that may contain asbestos.
- Identify the adhesive before choosing a removal method. Mastic may feel sticky, while other tile adhesives can leave a firm residue. If the material may contain asbestos, stop rather than test it by scraping or grinding. Once asbestos has been ruled out, try a small area first to see how the adhesive responds. This helps prevent spreading residue or damaging the concrete unnecessarily.
- Soften confirmed non-asbestos mastic before scraping. A citrus-based stripper or heat gun can soften mastic enough to lift with a scraper. Apply the stripper according to its product directions and let it work before scraping. If using heat, move the gun carefully over the adhesive rather than holding it in one spot. Remove softened material in manageable sections.
- Match the approach to peel-and-stick residue. WD-40 can break down sticky residue from peel-and-stick tile adhesive. Acetone can chemically soften peel-and-stick glue so it can be wiped away. Test the method in a small spot, and avoid spreading dissolved adhesive across clean concrete. Chemical removal can affect the bond of future floor coverings, so account for the planned finish.
- Clean the surface after scraping without moving straight to aggressive abrasion. Lift loosened adhesive and residue from each worked area, then inspect the concrete for tacky patches. If black mastic remains unidentified, appearance alone does not prove it is safe. For tile adhesive removal from a concrete subfloor, asbestos screening comes first; scraping or softening comes afterward.
Removing thin-set and mortar residue
Use a grinder or chisel for stubborn thin-set on concrete; soften mastic, then scrape it away. Before installing ceramic tile on the same concrete floor, keep remaining adhesive no more than 1/8 inch thick.
-
Choose tools for thin-set or mastic
Identify the residue, then match the tool to its texture. Thin-set mortar is hard, so grinding or chiseling can remove it from concrete. Mastic and peel-and-stick glue respond better to softening and scraping. A citrus-based stripper or heat gun can soften mastic, and a scraper can then lift the loosened material. Do not treat hard mortar like soft glue, or sticky mastic like cement.
-
Check residue before installing new flooring
Match the remaining residue to the floor covering planned for installation. For ceramic tile going back onto the same concrete floor, adhesive should be no more than 1/8 inch thick. A thicker layer needs further removal or surface preparation. Other floor coverings also need a suitable, clean base, so don’t assume residue is acceptable simply because it feels firmly attached.
- Choose grinding or chiseling when thin-set remains bonded to concrete. Grinding can reduce broad, stubborn deposits, while a chisel targets raised spots. Work carefully to avoid gouging the concrete beneath the mortar. If mortar covers cement board, removal may be difficult because screws can be hidden beneath it. Find and expose the screw heads before trying to lift the board.
- Assess cement board before committing to extensive mortar removal. Grinding, chiseling, or replacing the subfloor are options when mortar remains on cement board, but removing it may damage the board. In some cases, replacing the subfloor takes less effort than stripping mortar across the entire surface. Compare the board’s condition and the amount of bonded mortar before deciding.
- Scrape and level selectively if grinding is not the preferred approach. Remove as much loose mortar as possible, then chisel down high spots. Clean and vacuum the floor before applying leveling compound. This covers remaining low-profile residue rather than removing every trace. Use this approach only after preparing the surface and confirming the planned flooring can be installed over the leveled base.
- Allow repair compounds to dry or harden before continuing. Joint compound used to smooth a concrete subfloor takes 12-18 hours to dry. Hot mud for deep floor repairs hardens chemically within 20-90 minutes, depending on the compound. Leveling compound can also raise the finished floor. The amount of leveling compound needed can vary with the surface and flooring being installed.
A straight-edged garden edging spade sharpened to a chisel edge is one tool a contributor describes using to remove mortar. It offers another option alongside grinding and chiseling when mortar remains on the floor. The tool combines a straight edge with a chisel edge for this task.
Replacing the subfloor may seem like more work at first, but one answer suggests it can be faster than removing mortar from an entire floor. Compare the effort involved before committing to extensive removal. For broader home renovations or structural updates, professional renovation teams like HMJ Contracting can help assess whether subfloor replacement is a more practical route than complete surface stripping.
Grinding concrete to remove adhesive
Scrape softened glue when it releases easily, and grind only residue that remains firmly bonded. Grinding can remove stubborn adhesive, but it creates substantial dust and mess.
After removal, clean and vacuum the concrete. Inspect it for gouges, crumbling, and uneven areas before choosing the next preparation step. When airborne dust drifts into adjacent living or work spaces, professional property cleaning from lifestylehomeservice.com can help return the surrounding areas to pristine condition.
- Assess the residue before selecting a tool. A scraper can lift softened or loosened adhesive, while a grinder or handheld angle grinder can address stubborn material bonded to concrete. Chemical softeners can help with peel-and-stick glue, but may affect the bond of future floor coverings. Choose a method based on the adhesive’s condition and the floor’s intended finish.
- Decide whether grinding suits the whole surface. Broad, hard residue can make scraping slow and difficult, so grinding may be the practical option. If the adhesive is already loose, scraping avoids grinding the concrete unnecessarily. When loose and firmly bonded patches are mixed, scrape first, then assess whether the remaining sections need grinding.
- Prepare the work area before using a grinder. Grinding mortar or adhesive creates substantial dust and mess. Seal vents and doorways with plastic sheeting and masking tape to contain dust. Wear a dust mask, safety glasses, thick-padded gloves, long sleeves, long pants, closed-toed shoes, and knee pads. Keep loose debris out of the work zone.
- Use controlled passes rather than forcing the grinder against the floor. A concrete grinder or handheld angle grinder can remove adhesive, but poor control may gouge the subfloor. Move steadily across bonded patches and pause to inspect the concrete. If the tool catches, the surface starts crumbling, or you cannot control the tool, stop rather than pressing harder. Consider professional help for grinding work.
- Remove loosened residue as you work. Scrape away detached material, then vacuum the surface so dust does not hide remaining adhesive. Inspect each worked area again. A thin smear and a raised, hard deposit need different treatment. Focus grinding on bonded high spots rather than removing sound concrete.
- Clean and assess the slab before preparing it for new flooring. Vacuum the concrete after adhesive removal, then check for gouges, crumbling, and uneven areas. These defects affect the next preparation decision. Scrape remaining loose residue, chisel down high spots, or consider leveling compound where the surface needs correction. For extensive bonded residue, professional concrete floor grinding can help prepare the slab with controlled equipment.
How do you remove tile adhesive from a concrete subfloor step by step?
Work in sequence: identify the material, remove tiles carefully, then treat the residue. Inspect the surface at the end to determine whether it is ready for its next finish.
- Identify the tile and adhesive before disturbing either. Old or black mastic should be tested for asbestos before removal. Vinyl or linoleum tiles installed before 1980 may contain asbestos in the tile or adhesive. If asbestos may be present, stop and consult a licensed asbestos abatement professional. Don’t scrape or grind suspect material.
- Prepare the room and put on protective gear before starting. Seal vents and doorways with plastic sheeting and masking tape to contain dust. Wear a dust mask, safety glasses, thick-padded protective gloves, long sleeves, long pants, closed-toed shoes, and knee pads. Clear the work area so you can use a hammer and chisel steadily.
- Start at a loose or damaged tile edge and work the chisel beneath it. Position a masonry chisel about 2.5 cm wide at around 45 degrees between the tile and concrete. Tap it with a 4 lb hammer, keeping the angle shallow and pressure steady. This helps lift the tile while reducing the chance of gouging the slab.
- Remove ceramic tiles in manageable pieces, then collect the fragments. Keep the chisel close to the tile’s underside instead of driving it sharply into the concrete. If a tile resists, reposition the chisel and continue with controlled taps. Avoid striking toward your body, and clear broken pieces before moving across the floor.
- Choose a residue method based on what remains. Chisel or grind hard thin-set mortar, taking care not to damage the concrete. Scrape mastic after a citrus-based stripper or heat gun softens it. WD-40 can break down sticky peel-and-stick residue; acetone can soften that glue, but chemical removal can affect future flooring bonds.
- Clean the exposed slab and inspect it before deciding on further preparation. Scrape away loosened residue, then clean and vacuum the concrete. Check for gouges, crumbling, and uneven areas. If mortar remains high, chisel down those spots; if residue stays bonded, grinding may be needed. For ceramic tile returning to the same floor, remaining adhesive should be no more than 1/8 inch thick.
For a slab needing controlled preparation after tile removal, arrange professional concrete floor preparation.
Polished Concrete Atlanta: Polished Concrete Floors
When tile adhesive removal leaves a concrete floor needing professional preparation for its next finish, Polished Concrete Atlanta can help. Its floor preparation service addresses the slab before finish work begins, including when grinding reveals uneven areas or stubborn residue.
Polished Concrete Floors may suit a project that calls for a clean, finished concrete surface. Epoxy Flooring and Stained Concrete offer other surface treatments. The right choice depends on the concrete’s condition and the finish you want, not just on the adhesive removed.
After assessing the slab and deciding on its next use, contact Polished Concrete Atlanta to discuss floor preparation or a concrete finish for your project.
Plan the Next Chapter for Your Concrete Floor
Once tile adhesive removal from a concrete subfloor is complete, look beyond cleanup. Let the floor’s intended use and the appearance you want guide the finish decision. A prepared slab can become a finished surface in its own right, rather than simply serving as a base for another covering.
Polished Concrete Atlanta offers Polished Concrete Floors, Epoxy Flooring, and Stained Concrete. Each creates a different look and function for a concrete surface. Consider how you want the space to look and perform, then connect floor preparation to the result you have in mind.
Explore the options and discuss your project with Polished Concrete Atlanta. Your concrete floor can move forward with purpose and a finish suited to your space.
Frequently Asked Questions
How can you identify whether tile adhesive contains asbestos before removal?
You can’t confirm asbestos by color or appearance; arrange testing before disturbing old or black mastic. Black adhesive may raise concern, but appearance alone doesn’t establish what it contains. Vinyl or linoleum tiles installed before 1980 may also contain asbestos in the tile or adhesive. If results are positive, leave removal to an asbestos remediation company rather than scraping or grinding the material yourself.
How do you remove black cutback adhesive from a concrete subfloor safely?
Have black cutback adhesive tested for asbestos before attempting tile adhesive removal from a concrete subfloor. If it tests positive, stop and have an asbestos remediation company handle removal. If asbestos is ruled out, choose a method based on how firmly the adhesive is bonded: scraping may lift softened residue, while stubborn material may require grinding. Grinding creates substantial dust, so protect the work area and use appropriate PPE.
What rules apply to asbestos testing and disposal of tile adhesive in the United States?
Have suspect mastic tested before removal, and have an asbestos remediation company remove material that tests positive. Testing and disposal requirements can depend on the project location and the material’s classification, so do not assume ordinary flooring debris can be discarded in the same way. Ask the abatement company to determine the applicable handling and disposal process for the specific site. Do not disturb or dispose of suspect adhesive yourself before its status is established.


